The Special Hobby Reggiane Re.2000 and Heja I/II kits fulfilled a very much needed reprisal of this classic design by Ing. Roberto Longhi that time and technology had left behind in the form of the very respectable and old Supermodel kit. It's been reboxed now by Italeri with several upgrades.
Regarding the SH HejaII, it's basically the same sound kit as the Re.2000, with a different vacuformed canopy, resin cowling, breeches, oil cooler and prop spinner. The remainder of the kit is unchanged, which is good for the resin cockpit is simply incredible. And very hard to see once the fuselage is closed, but hey, you know it's there, right? The decals are first rate. The only thing I wonder is why did they print 2 consecutive machines in them, V.5+39 and V.5+40. There were Hejas in the 400 and 600 series as well, but I suppose it'll always be a mistery.
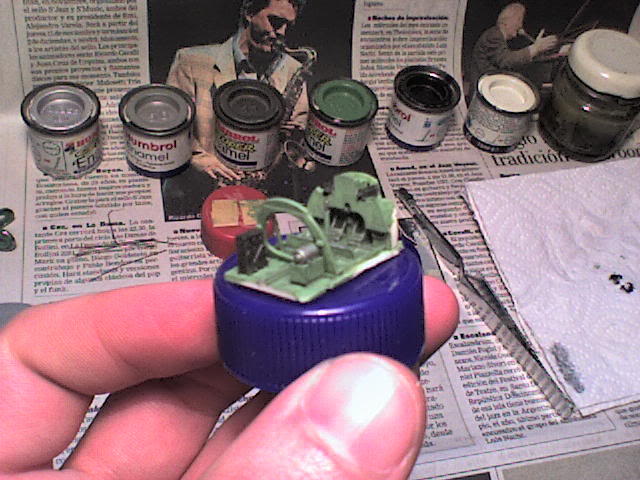
As usual it all started with the cockpit. It was painted in Humbrol H-120 for the cockpit, H-33 and 56 for the radio set and switch boxes, which are barely visible, just like the oxigen bottle. For the gun breeches, H-53 and H-56 were used.

For the weathering, a combination of black washes and drybrushing with H-191 was used.


Extra care has to be taken when gluing the tiny little PE levers and wheel placed inside the cockpit walls. I was going to add all the pushrods to the WMK-14b but it turned out that I was out of copper wire and steel strings, so I left it be.

You have to be careful to glue the walls properly filed and leveled. I didn´t and had to teake one off, sand it to the proper height and re-attach it.


The resin seat is painted in H-191, the PE chains and leather straps in H-56, H-186 and MM Italian Red Brown. Once finished, the cockpit looks busy and greatly detailed.


The cockpit is glued to the fuselage, which you have to close first. It almost falls into position and with a little TLC you can superglue it out of harm's way.
Gluing the wings and tail planes was very straight forward. The only area of concern is below the chin and the lower rear fuselage joint, where you have to putty and sand a little bit to get them right, but it's not a major work to perform. Extra care has to be taken when taking the resin cowling and breech covers from their pouring gates. With sand paper you have to soften any remaining edge or bevel they may leave. With that done, they glue in position pretty straight forward. A small dab of putty on the fuselage joint beetween the breeches and that's it.


The basic scheme is somewhat involved, since you have so many colours in a small airframe. Hungarians followed the italian scheme of the early Hejas very closely. However, they seem to have left the Red Brown out of the equation. Upper camouflage wraps around the fuselage, stabilizers, engine and leading edge of the wing in a typical italian way. Where it departs is the way they painted it, being less "cloudy" and more general overspraying, like an overcoat, when seen in pictures. Ferenc Kass's V.5+39 was chosen from the decals. It's always nice to put a name to go with an airplane. Specially a little known one like the Heja II.

The first thing to do was to paint the entire aircraft in gloss white, Humbrol's H-22, check for blemishes and then spray the underwing yellow panels and fuselage band. Later, when it was dry, I masked the tail bands and hand painted them in H-19 and H-101. Despite the coarse finish, I truly like it, since it looks very much like the real thing shown in pictures.

Once everything was masked, along came the underside colour, MM's Italian Blue gray and once it dried, Humbrol H-63 for the upper side base coat was sprayed, followed by a light, yet dense, mottling woth MM's Italian Olive Green.

With the painting done and dry, it was time to give it a glossy coat. The masking for the wings, fuselage and stabilizers came off and Revell 01 was used for it and applied to the whole of the aircraft, landing gear covers and propeller. Next came the decals and they were top quality, being laid on the model with water and a little Decalfix.

I sprayed the whole model with Revell's 01 again and disaster struck: paint started running off the lower fuselage. I was startled for a second or two, as if a giant "Ooopsy Daisy!" luminous sign passed through in front my eyes, before tossing away the airbrush and drying the dripping, soaked model with small, quick touches of a paper towel.

What caused that? I don't know. May be the diluting rate was wrong, may be I screwed up the airbrush settings when I cleaned it before use. (Yeah, I'm that kind of freak, so what?) I still believe it was my fault and not Revell's varnish. The cowling ring had some varnish "runs", so it was lighlty polished and then brush painted with MM's Black, far more easier to paint without leaving strakes than Humbrol's H-33. The underside of the fuselage got badly beaten up by this, so I retouched some places with the original blue gray and then gave the whole plane some light washes with highly dilutted H-33. The area around the wing's center section was given some extra attention and so the whole putrid varnish affair was overcome.

Once it was all dry and with the bad taste of almost total disaster still in the back of my mouth, varnish dry and small pieces prepared for final assembly, I glued the propeller to the engine, the landing gear to its proper location under the wings and tailplane, the small resin wingtip lights were attached once more to their holes, after coming loose for the 28th time and finally, the pitot tube and landing gear wheel covers. The exhaust tubes were painted with a mixture of H-53 and Revell 94. Off came the canopy masking and that was it. I finally have a small Heja II in my collection.


It's stubby. It's colourful. It's czech short run. It's an italian aircraft, based on an american design, with a french engine, built, armed and flown by hungarians. But, above all, it's a beauty.
Till our next installment, take care and good luck,
TMU
Comments