I 've always been a fan of Waco airplanes. Their purity of lines have always intrigued the modeling ghosts that haunt me (borrowing the title from a Crash Test Dummies' album), the rounded surfaces and armonic designs pleased my eye since I first got to know them in a movie some 25 years ago. Multitude of engines, variants, open and closed cockpits, militarized versions, skis, floats and wheels. Not to forget the huge number of colour schemes and that funny designation system.
Sadly enough, there are not many Waco kits out there. Perhaps the oldest one is Italeri's Waco CG-4 glider of WWII fame. There are a handful of resin and vaccuformed kits as well, of varying quality. I recall Khee-kha's YKS, Dujin´s ZQC cabin biplanes and the S3HD from uruguayan kitmaker Alfatango. So, I was surprised when walking by a hobby shop in downtown Buenos Aires I saw a couple of boxes in the window, from an unknown kit maker called Commando5. Intrigued, I walked in and asked for them. The stack pile comprehended a Waco CSO, Vultee V-11, Fw-58 Weihe and Meteor T.7. I bought the Waco and the Vultee, those being 2 of my favourite aircraft companies, the CSO being such a cute little biplane and the V-11 is a real underdog on its own right.
Commando5's Waco CSO comes in a small cardboard box with several small plastic bags, within a larger bubblewrap sleeve. Clever thought that some bigger companies should follow. First things first, so all the resin parts got a thorough cleaning in tepid, soapy water. I was very pleased with how thin was the vaccuformed windshield and the decal definition, though the method to apply the latter seemed a little awkward to me. More on this later.
All the major components were cut off from their pouring blocks with an X-acto blade. Small items like struts, Venturi, wheels, landing gear and cockpit interior were left in their blocks to forsake any damage or loss. The fuselage looked weird to me, and it turned out to be bent to the left. That kind of thing happens with resin parts sometimes and the solution is quite simple, guaranteed the resin itself is not too brittle or the piece too thin. You heat some water and dip the part for some time, depending on the thickness and kind of resin you're working with. You take it out off the water and start pulling to the other side really gentle. Follow suit, you repeat the process as many times as necessary. It got straightened enough in the end but being a solid resin block it took more time and hot water than I expected.
The lower wing was super glued to the corrected fuselage after its fuselage recess was sanded and imperfections eliminated. There were several, both tiny and medium sized bubble holes on the underside of the fuselage. While putty can be used for smoothing the surface, I tend to use super glue in this cases, besides the all the usual super gluing work that resin kits need. The reasons is simple, most puttys seem to be softer than resin itself, doubling the work needed to smooth a surface. After covering all the blemishes, the underside was water sanded, holes and dimples smooth out.
With that out of the way, the cockpit parts were taken off their blocks and cleaned up. The tiny instrument panel has some remarkable detail. The dial faces even have indicators on them. The seat presents the modeller with some fine detail work and harness representation. All of the interior was painted with Humbrol paints. H-56 Alluminium for the cockpit and H-33 Matt Black washes to bring out the detail. On the instrument panel the process was the opposite, H-33 then H-56 dry brushed on it; glossing the dial faces with Revell's 1 (Gloss Varnish). The seat had its leather upholstry painted in ModelMaster's Italian Red Brown and then dry brushed with H-186 Red Brown. The harness was picked in H-74 Linen and the seat metal structure in H-191 Chrome Silver. When all was thoroughly dry, a light wash with H-33 followed to bring out the detail cast on the resin.
Once everything was in place the upper coaming was glued into place. Not a great fit, specially at the rear end but nothing that some superglue and careful wet sanding wouldn't fix. The lovely little engine was fitted and the front end sanded into shape.
The starboard side view. Obviously, a lot of work was needed, but I enjoyed fairing in the upper coaming. The elevators had been deflected with a careful pass of an X-acto blade, but one of them came off. So I cut them all the way and superglued them just to have a tight bond beetween them and the stabilizator. The fin was glued at this time. Resin for this was gum like, so I "painted" the piece with some slow action superglue, to give it more strength. Still kind of wobbly but better than anything.
Next attached were the undercarriage and cabane struts. It required some minor trimming of the resin parts to make them fit. The rear struts are to be provided, so two lengths of Aeroclub material of a suitable size was cut and attached. Also, 4 small lenghts of stretched sprue are to be glued on the upper end of the hydraulic shock absorbers.
To finish main construction, the upper wing was attached. Funny thing, the casting block had "Original" written in pencil on its side. May be the manufacturer misplaced this piece and ended up in a production kit. Feel kind of guilty about it sometimes. Anyway, the only thing left to do was to glue the main struts. Since the resin ones were kind of flimsy (remember that soft resin issue I wrote a few paragraphs before?), the were exchanged by Aeroclub material of the right thickness. The aileron actuators were done with stretched sprue, and that was it.
Onto the painting stage. The whole of the model was painted with Humbrol's H-22, Gloss White. After a second, thorough coat was left to dry. All of it was painted in H-19, Bright Red. It was followed by a second coat and left to dry thoroughly. Taking advantage of the glossy, smooth finish, the decaling process began.
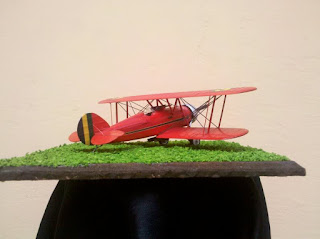
Commando5 decals use the same system that FCM provides with theirs. That is, a continous film from which you cut the images, soak them in water and place them on your model as usual. The trick is that once dry, you peel the upper carrier, leaving only the decal itself. Try it as it may with a chinese decal option, it didn't work. So I trimmed the excess carrier from the brazilian ones and applied them to the model as if they were the usual, less troublesome decals I'm used to. It worked. So, after painting and gluing all the remaining bits and ends here it is, finished at last.
Minor bits include the rudder, painted in suitable colors from the Tamiya and humbrol ranges.
Nice outline for a classic biplane, isn't it?
Rigging was done with an "e" guitar string, which now I feel is kind of thick. Next time, will try mandolin strings for this kind of petit biplane.
Aeroclub rigging material was used fot the stabilizator flying wires, and it looks nicer than my overgrown musical wiring.
The tailskid provided with the kit proved to be very flimsy, but it also flew out off my tweezers and into oblivion while cleaning it up. So, it was replaced by two lengths of guitar string and painted H-56 Aluminum.
The bombs were cleaned up. No easy task, since they had crumbles of resin all over them. But after some work, they passed my not so rigorous exam. Painted in H-86 Light Olive Green and with their detonators and shackles picked out in H-191, they were glued to the model.
A subtle wash of H-33 Flat Black was given to the moving surfaces and the fuselage hatch to make them stand out.
The windshield was carefuly cut from its backing and ruined. So, thanks go to Commando 5 for providing a spare! It was glued to the fuselage with Cristal Clear from Humbrol. The small Venturi was salvageable after some careful wet sanding. Painted H-53 Gun Metal, it was placed on the fuselage.
Machine guns were a little gem, but too brittle to be hollowed out. Painted Gun Metal as well, they make the CSO look like a W.W.I fighter.
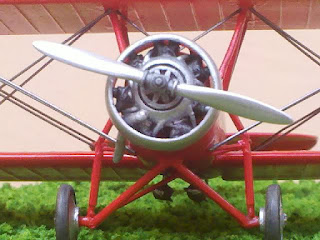
The lovely engine was painted after the main scheme was applied. Cilynders picked up in H-53 and then dry brushed in H-56 Aluminum, their collector ring and exhaust were painted in H-191 Chrome Silver. The engine's crank case face was painted in H-53, dry brushed in H-56 and then a dry pass of 191. A light wash with H-33 finished that part.
The cowling and propeller were fitted next. The resin prop was very
gummy like, so a two bladed propeller from the old Revell Ford Tri-motor
was used. Same diameter, same pitch, same blades, but a better product
altogether. Both items were painted in H-191 and the propeller nut
picked in H-53, dry brushed woth H-56 and washed with H-33 to a nice
effect. Wheel hubs painted in H-191 and their bolts picked in H-33 via a
light wash. Tyres are a mix of H-33 and H-27 Dark Blue Grey, dry
brushed with H-118 Light Earth for the dusted up appearance.
And so concludes another chapter in this belated modeling connundrum, the first article of the year and a rather enjoyable one. The experience was refreshing after so many years of not building a resin kit. I love Wacos, there's no secret to it, and having the chance to build one of the lesser known versions in such an interesting and lovely scheme added a plus to the experience.
Till our next installment, take care and good luck,
The Modeling Underdog.


Comments