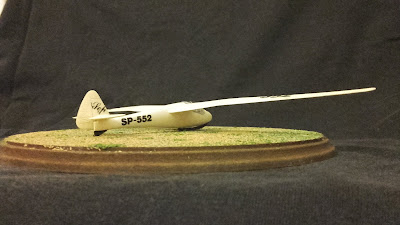
The glider.
The IS-1 Sep (Vulture) was a high performance glider series built by the Gliding Institute in 1947 as a kickstarter after the end of WWII. Much to its designers delight, the glider was not only a success with its pilots, it also went on to achieve many records in its home country and Europe. More information is available here:
I've always had an unfullfilled desire to have gliders in my collection. Hard to come by or right down beyond price range, it came to me as a nice surprise when a fellow modeler posted the Sep for sale in a Facebook group, along with a Mucha Standard and a Bocian twin seater for a few bucks. PZW (and its ZTS, brethren) has issued many a kit in its lifespan, such as the PZL P-7 and P-11, RWD-8 and a glider series including the aforementioned ones. With a little work and checking the decal quality, they can be made into very nice replicas.
The kit. PZW's 1/72nd IS-1.
It comes in the usual PZW white plastic, nice to work and plentiful of flash, though it's easy to remove due to the high plastic quality. The cockpit was painted Humbrol's H-127, with the seat in ModelMaster's Italian Red Brown, details picked in Black H-33 and harness straps in Monitor's Buff. You have to be careful when attaching the wings and the following sanding has to be done with wet & dry. After attaching the stabilizators, its time to paint the model.
The best colour for the airframe is Humbrol's H-41 Ivory. Provided you mist it in several layers, the finish should be glossy and very smooth. There's no point in going all thick and smudgy with the spraying. After all the original was built to a high standard with very smooth finish. Also, let the model dry thoroughly with this kind of gloss colours, it will improve the looks of it and prevents tacky fingers of playing havoc with the paint work. To hurry is to harry, so to speak.
The gloss surface works well for decalling most of times. I was very much worried about the decal quality in the kit, so I tried a small piece of it on the glossed surface and it worked very well. I guess it was one of those "who would have guessed it" kind of situation. The wing registration has to be cut in half as per photographs onw wing carried the country registry and the other an ID number. Decals actually settled down without silvering at all. The only bummer was my undoing when I pierced through the upper wing hyphen with a scalpel, but the old, trusty Letraset dry transfer came to the rescue. Satin Cote was sprayed afterwards to seal it all.
Last bits to attach where the venturi / drift indicator and skid, both painted in black. The original canopy is brutally cloudy and irreparable, so it was used as a mold for a new one. When elongated and widened at its lower point, since it seats too low and too inward on the cockpit seal, a smash moulded canopy was cast upon it. Tamiya masking tape was used to paint the canopy structure, the colour chosen, Humbrol's H-11 and the canopy attached with Clearfix. A thin wash of Mig's Smoke was applied to the crevasses.
Well, it's a nice addition to the shelf. And finally, after so many years, I have a sports glider! Given care and patience, it's a very simple and elegant kit you can produce of a significant sailplane. If you can find it, give it a try.
Until out next installment.
Take care and good luck.


Comments